Double Bollinger Bands Strategy
I’ve tested a lot of trading indicators over the years, but the double Bollinger bands strategy quickly became one of my favorites. Here’s the deal: a regular Bollinger Band gives you one set of lines. The double Bollinger bands give you two, typically at 1 and 2 standard deviations. Why does that matter? Because those inner bands help you tell the difference between a simple pullback and a real trend reversal. Think of it like a traffic light: green, yellow, and red zones instead of just green and red.
In this guide, I’ll show you how to use double Bollinger bands in Forex, stocks, and crypto. We’ll walk through real entry rules, where to place your stop-loss, and the mistakes I see beginners make all the time. Whether you’re a day trader or a swing trader, this strategy will sharpen your timing and keep you out of bad trades. Let’s get into it.
What Is the Double Bollinger Bands Strategy?
Let me break this down in plain English. A standard Bollinger Band has three lines: a middle moving average (usually 20 periods), an upper band at 2 standard deviations above, and a lower band at 2 standard deviations below. The double Bollinger bands strategy takes that and adds one more set of bands right in the middle – at 1 standard deviation above and below.
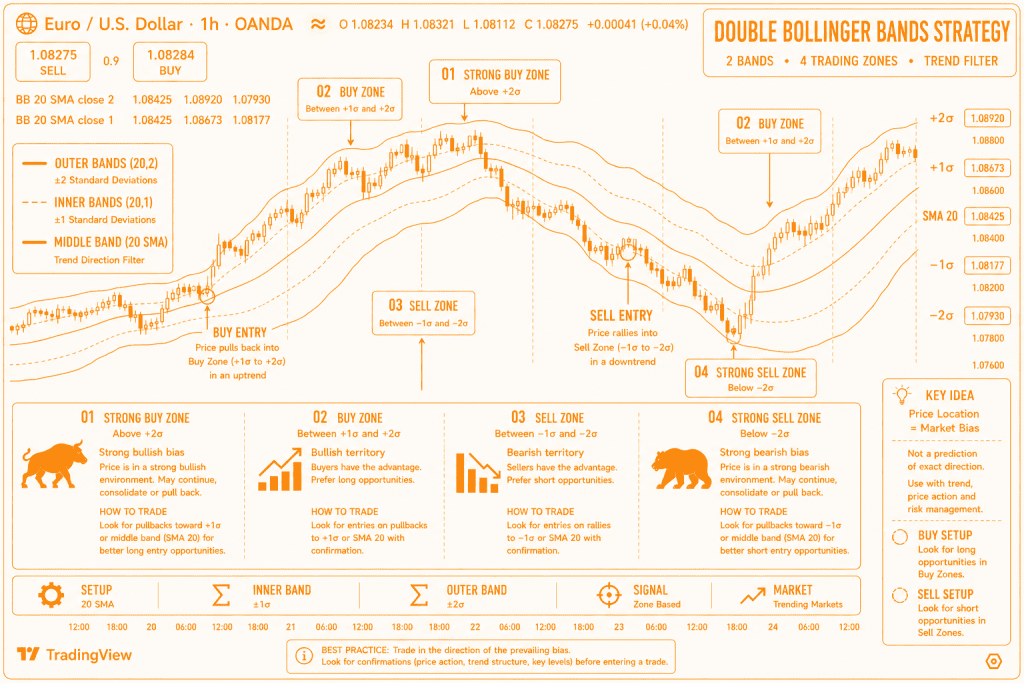
So now you have two bands on each side: an inner band (1σ) and an outer band (2σ). That gives you four distinct zones instead of just two. Here’s how I think about them:
- Strong buy zone – price is above the upper 2σ band. This is aggressive momentum.
- Buy zone – price is between the upper 1σ and upper 2σ bands. Healthy uptrend.
- Sell zone – price is between the lower 1σ and lower 2σ bands. Healthy downtrend.
- Strong sell zone – price is below the lower 2σ band. Aggressive downward momentum.
The magic of double Bollinger bands is that the inner band acts like a magnet. In a strong trend, price tends to pull back to that 1σ line before continuing. That’s your low-risk entry point. Without the inner band, you’d be guessing whether a pullback is just a hiccup or the end of the move.
How to Set Up Double Bollinger Bands
Before we get into trades, let me show you how to set this up on your chart. It’s easier than you think.
Go to your indicator list and add Bollinger Bands. You’ll need two of them. Here are the exact settings I use:
First Bollinger Band (the outer one):
- Length: 20
- Source: Close
- Standard deviations: 2.0
Second Bollinger Band (the inner one):
- Length: 20
- Source: Close
- Standard deviations: 1.0
That’s it. Same length, same source, just different standard deviations. The outer band catches the extreme moves. The inner band shows you where price likes to pull back.
One quick tip: pick a color for each set so you can tell them apart easily. I use dark blue for the outer bands and light blue for the inner bands. Some traders use red for outer and gray for inner. Do whatever works for your eyes.
Once both bands are on your chart, you’ll see two tunnels on each side. That’s your double Bollinger setup ready to go.
How to Use Double Bollinger Bands in Trading
Now, let me walk you through exactly how to use double Bollinger bands step by step. I keep this simple because complicated rules just lead to mistakes.
The Long Entry (Buy)
First, I wait for price to close above the upper outer band (2σ). That tells me momentum is strong to the upside. Then I wait for a pullback – price comes down and touches that inner band (1σ). That’s my trigger to buy. Think of it like a bouncing ball. It jumps high, then comes back down, but when it hits that inner band, it bounces right back up.
The Short Entry (Sell)
Same idea but flipped. I wait for price to close below the lower outer band (2σ). Then I wait for a rally back up to the inner band (1σ). That’s my signal to sell. The market is telling me sellers are in control, and the rally is just a quick breather.
Where to Put Your Stop Loss
This is crucial. I place my stop loss just beyond the outer band (2σ) on the opposite side. For a long trade, the stop goes below the lower outer band. For a short trade, stop goes above the upper outer band. That gives the trade room to breathe without getting stopped out by normal noise.
That’s the core of the 2 Bollinger bands strategy right there. No extra fluff. The double Bollinger strategy works because it gives you a clear trigger instead of guessing when to jump in.
Double Bollinger Bands Trading Strategy Rules Summary
Let me condense everything into a quick rules checklist. I literally keep this on a sticky note next to my screen. Here’s the double Bollinger bands trading strategy in four simple rules.
Rule 1 – Trend Confirmation
Price must close outside the 2σ band. Not touch it. Not kiss it. Close outside. That’s my confirmation that momentum is real. If price can’t even push past the outer band, there’s no trade for me.
Rule 2 – Entry Trigger
Once price closes outside the 2σ band, I wait for it to come back and touch the 1σ band on the same side. That touch is my trigger. For a long trade, price closes above upper 2σ, then pulls down to touch upper 1σ – I buy. For a short trade, price closes below lower 2σ, then rallies up to touch lower 1σ – I sell.
Rule 3 – Exit
I get out when price crosses the middle line (the 20 simple moving average). That’s my signal that the trend is losing steam. Some traders wait for a close beyond the middle line. I don’t. A simple cross is enough for me.
Rule 4 – When to Stay Out
Here’s something most beginners ignore. Do not trade this strategy in sideways markets. How do you spot a sideways market? The bands go flat. They stop expanding and just run horizontally. When I see that, I walk away. No trade is better than a bad trade.
That’s the entire double Bollinger band strategy boiled down. Follow these rules like a robot, and you’ll save yourself a lot of headaches.
Double Bollinger Bands vs. Single Bollinger Bands
I get this question all the time. Why bother with two sets of bands when one has worked for decades? Fair question. Here’s my honest answer after trading both for years.
A single Bollinger Band tells you when the price might be overbought or oversold. That’s it. Price touches the upper band? Probably too high. Price touches the lower band? Probably too low. But here’s the problem – in a strong trend, price can hug that upper band for days and keep going higher. If you sell every time the price touches the upper band, you’ll get crushed.
Double Bollinger bands solve that problem. The inner band (1σ) acts like a truth teller. It shows you whether the trend is still healthy or about to reverse.
Let me show you the difference side by side.
| Feature | Single Bollinger Bands | Double Bollinger Bands |
|---|---|---|
| Number of bands | 3 (middle, upper 2σ, lower 2σ) | 5 (middle, upper 2σ, lower 2σ, upper 1σ, lower 1σ) |
| What it tells you | Overbought / oversold | Trend strength + overbought / oversold |
| Signal example | Price above upper 2σ = sell signal | Price above upper 2σ = strong trend, wait for pullback to 1σ |
| Works in trends? | Poor (false signals) | Good (filters out noise) |
| Works in sideways? | Decent | Decent (but better to avoid both) |
| Learning curve | Easy | Slightly steeper but worth it |
The bottom line? A single band is like a thermometer. It tells you the temperature. Double Bollinger bands are like a full weather forecast. They tell you the temperature, the wind direction, and whether a storm is coming.
That’s why I switched to the 2 Bollinger bands strategy years ago and never looked back. Fewer false signals mean fewer headaches.
Conclusion
The double Bollinger bands strategy has been a game-changer for me. By adding those inner bands at 1σ, I cut down on false signals and got a much clearer picture of trend strength. But let me be real with you – no strategy works 100% of the time. Always use proper risk management. The double Bollinger bands trading strategy shines in trending markets. When the market goes sideways, just sit on your hands. My advice? Practice on a demo account first. Get comfortable with how to use double Bollinger bands before you risk real money. Once you do, stick to the rules and let the strategy work.
FAQ
What is the main difference between single and double Bollinger Bands?
Single Bollinger Bands use one set at 2 standard deviations. They show volatility and overbought or oversold conditions. Double Bollinger Bands add an inner set at 1 standard deviation. That extra set helps you define trend zones more precisely and cuts down on false signals.
Which time frame works best for the double Bollinger bands strategy?
I personally use 15-minute to 4-hour charts for day trading or swing trading. If you’re a position trader, higher time frames like the daily chart work just fine. Just avoid very short time frames like 1-minute or 5-minute. Too much noise.
Can I use the double Bollinger band strategy with other indicators?
You can, but you don’t have to. This strategy works great on its own. That said, I sometimes add RSI or MACD for extra confirmation. Just don’t overload your chart. Two indicators max, including the bands.
What happens when Bollinger Bands widen sharply?
Widening bands mean volatility is spiking. Most beginners panic and jump in. Don’t. In the double Bollinger strategy, you wait for price to pull back and touch that inner band (1σ) before you enter. Never enter when price is touching the outer band (2σ). That’s how you get trapped.

